Wednesday, April 27, 2011

Linocuts

Sometimes what I do- Fabric Collage- reminds me of linocuts.  Since a successful linocut print relies so heavily on the juxtaposition of texture and pattern, it resembles the same technique of placing different textures and patterns of  fabrics in relation to each other for effectively portraying an image.  This example by Pablo Picasso demonstrates the use of multiple patterns to achieve the desired image.
"Still Life with Glass Under the Lamp"
And another example by artist Monica Miller
 
In a linocut, there is, out of necessity,  no  blurring of lines between different patterns of the cuts, since it is used as a printing block.  Because linocut prints are often black and white, they require very specific direction of cuts adjacent to each other  to delineate a specific image.  This is also true of fabric collage.  The medium itself dictates that textures or patterns placed next to each other are distinct in order to define image, background, shadow, etc. Using batik fabrics can alter this a bit because their patterns are a bit more blurry to begin with. Batiks give more of a watercolor effect.  ~LW

Wednesday, April 20, 2011


Ok, so it’s raining outside and it’s not balmy anymore like that teaser we got last week.  It’s all good !!  Chicken Corn Chowder simmering on the stove and this quilting project that has really got me excited, is keeping me going on this gray day .  I am working with limited time, so, instead of tracking down my mother’s old quilt sticks and spending a delightful afternoon over tea, with sisters or friends, hand-stitching this quilt, I am forced to do the speedier method.  In order to make it easier to handle, I am machine quilting sections of the quilt; about 26” square at a time.  Starting with the center block, I have machine-stitched basically in diamond patterns; following the pattern of the quilt.   It’s important to keep the outer edges of each 26” block free from stitching since we are sewing the tops of the blocks separate from the backing.   This is the back side which shows the stitching lines better. 

There will be 5 blocks like the center and 4 of the alternating pattern
                       
When all the blocks are completed, lay them all out to make sure they will be sewn in proper order and orientation.  There are 3 rows of 3 blocks this size ( 26”).  So I am sewing 3 blocks in a row.  The next block to the right of center is sewn , right sides together, on top of the center block..   Stitch only the top pieced layer and batting of the second block to the pieced layer and batting of the center block , leaving the backings free.


.  Fold flat and on the back side,  fold over the raw edge of the quilt backing of one block and tack that in place by hand over the backing of the other block so there are no raw edges . 


Then, topstitch this from the right side to make a more finished look.  Repeat this process with the block to the left of center. This leaves me with a rectangular piece consisting of 3 – 26” blocks sewn together in a row.
Repeat this with the remaining two rows of 3 blocks.  Then sew the three rows together on the long side using the same method of leaving the backing free and tacking it by hand on the back, then top-stitching on the right side .  Once this is finished you have all of your quilting already finished and we are ready for the borders.
 I am a little ahead of myself here, so I will come back when I am caught up to do the borders.    See you then !!     LW                     

Tuesday, April 12, 2011

Quilting Interlude

Taking some time to finish a quilt I began a couple of years ago (oh, horrors !!).  This is one of those projects I had started with great enthusiasm and had made some real progress and then  forgotten about in the midst of day to day work , etc.  I was inspired by a quilting show I had seen where they featured strip quilting.  I have used the strip-quilt method before, but usually for a log cabin pattern. I wanted to do a design using triangles where little if anything was wasted when cutting the strips to make a pattern. Over the next while I was thinking about a home for the quilt I wanted to finish "someday".  I don't really need it and wanted to give it to a worthy cause.  Well, I now have one.  There is a 10-year old boy in my area fighting an aggressive form of brain cancer and they are having an auction this month (April) to help the family pay for medical expenses.  That is a match made in heaven !  I now have a great desire to finish the quilt and am so happy it will have a place to go.
This is what I have so far.  The rest will be repetition of these patterns for the most part.


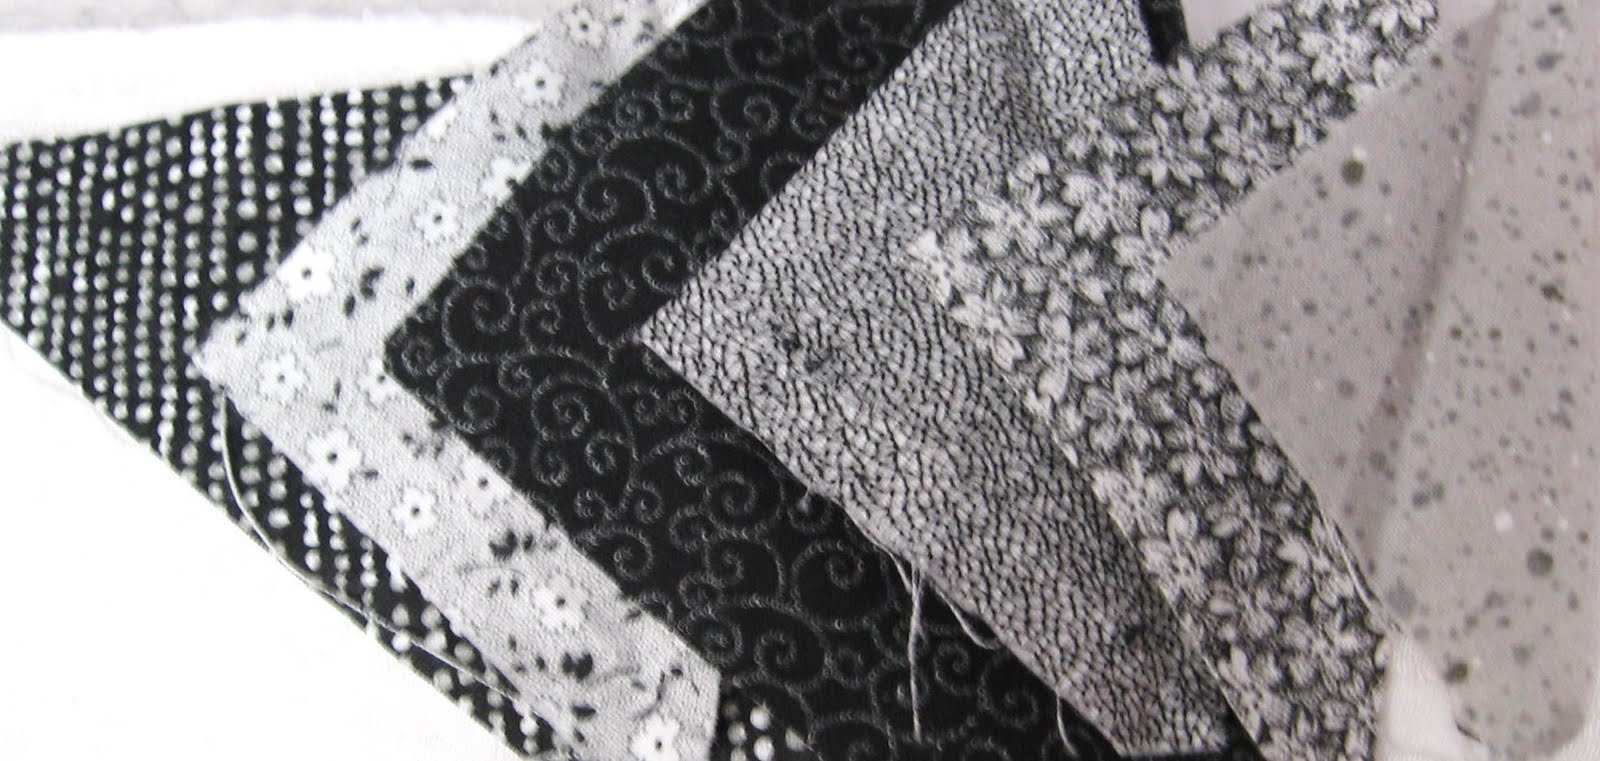
There are 6 different fabrics used in this quilt.  It's mostly a monochromatic look with a couple of darks thrown in for effect.  Each strip is cut 3" wide and sets of 2 strips (according to pattern) are sewn together- lengthwise and then cut into triangles.  There are a couple of  places where there are 3 strips sewn together.  This is necessary to make the blocks square.   The fabrics represent  1 to 6 from left to right in the photo below.


Below is the basic layout of the whole quilt, but I might need to do some half-blocks or extra borders to make 
the finished dimensions correct, since this is basically square.


 Starting with the center block (outlined in blue above), I am using all 6 fabrics as shown in the diagram below.  I have drawn lines to show where the triangles are.  So, for the center block I am sewing together strips of fabrics # 1 and # 3,  #2 and  #3,  #3 and #4, and #3,#5 and #6 ( the only 3-strip triangle in this block).


After the strips are sewn together the triangles need to be cut.  The base of the trangle is about 11.5 inches . The height is about 5.5 inches at the point. When you cut the triangles, for example, with the #3 fabric at the top point, you have left, the opposite triangles with the #3 at the bottom.  Those, as well as the other "opposite" triangles, I am using in the other surrounding blocks or borders around the entire quilt


Strips for the second block are sewn together as follows: fabrics # 2 and #3,# 3 and #4 and #2,#3 and #5.  I would suggest sewing the #5 fabric on after cutting the 2-strip triangle of fabrics #2 and #3.  Otherwise you will get all of those "opposite" 3-strip triangles that may not have a home and will cause more waste.


From the example of fabrics #2 and #3 in the photo above the  triangles with the #2 fabric at the point of the triangle and the #3 fabric at the bottom are used in the blocks surrounding the center block.  These are outlined in blue in the photo below.  Actually there will be a third strip  of #5 fabric (mentioned above) sewn to this triangle to complete the size needed to fill out the large square block.
As for piecing the triangles together,  I can give more information to anyone who is interested, but as a general rule, you want to sew in straight lines whenever possible.  That means you sew triangles into squares or rectangles or larger triangles and then sew those pieces together.  The back side of the pieced quilt below, may give you an idea of how you can do this.


 This is probably a bit confusing to beginners, but for you avid quilters.....it should give you a pretty good idea of what I am up to.  I will hopefully add more details about my progress as time permits.  If anyone is interested in more details about construction of the quilt or the pattern idea, I would be very happy to share as best as I can.  I will admit it was a sort of fly-by-the-seat-of-your-pants design.    But I will do my best to explain or answer questions.  Just contact me by email :  lynettelwilliams@gmail.com
Hope it inspires you to strip quilt.  It really is a very versatile way to make quilts quite fast !
Have fun !!
LW


Thursday, April 7, 2011

Spring Break

This week is Spring Break week for lots of schools in our area. Weather is finally warming up a little here in Michigan. Crocuses (shouldn't it be croci?)are peeping through the leafy brown earth.  What a joy to see them !!  Nature is a common inspiration for artists .  It isn't any wonder.  Nature is dazzling this time of year ...not so much for the color , yet, but for the metamorphosis below and above ground that seems to excite all of nature.  It spurs the imagination .
I am not writing about fabric collage today because I have some sewing projects with deadlines that are looming over me and I cannot do what I would rather do. That does allow me to take a step back from pieces I am working on in fabric collage, though.  I find that is a good thing.  Taking time to stop a piece of artwork and get some distance from it often gives me a fresh perspective and attitude  and helps me to improve the piece when I return to it.  


Life imitates art far more than art imitates Life.
Oscar Wilde

Sunday, April 3, 2011

Rabbit Trails


I often go down rabbit trails.  This week I went to a second - hand shop and there I found a sheer print blouse that inspired me in a different direction .  I put my fuchsia fabric collage on hold to pursue this new track.  Actually it's pretty typical for me to have more that one collage going at once.   I have worked with chiffon/sheer fabrics in the past but usually not for the whole piece.  What I like about them is when layering the fabrics, you can get some wonderful ethereal effects. The above left photo is what came at the end of my rabbit trail.  The working title is "In the Garden".  My vision was to portray someone surrounded by flowers and almost becoming part of the garden. This is a little more abstract than I usually do. But I think this type of fabric lends itself well to abstractions. I plan to do a whole series of Tulips using sheer fabrics.  I will post those efforts in the future.


My rabbit trail excursion reminded me of one of my favorite poems by Robert Frost :
TWO roads diverged in a yellow wood,
And sorry I could not travel both
And be one traveler, long I stood
And looked down one as far as I could
To where it bent in the undergrowth;        5
Then took the other, as just as fair,
And having perhaps the better claim,
Because it was grassy and wanted wear;
Though as for that the passing there
Had worn them really about the same,        10
And both that morning equally lay
In leaves no step had trodden black.
Oh, I kept the first for another day!
Yet knowing how way leads on to way,
I doubted if I should ever come back.        15
I shall be telling this with a sigh
Somewhere ages and ages hence:
Two roads diverged in a wood, and I—
I took the one less traveled by,
And that has made all the difference.   

Till next time   ~  LW

Saturday, April 2, 2011

Fuchsia Plant Fabric Collage - part 2


Revisiting my fabric choices for the fuchsia flower, I decided there were too many mid-range values and made a few changes. I feel the second group of fabrics shows a better progression of values from light to dark than the first group.

This is a really simple piece with only a few elements. The rest of the fabrics are for background and leaves.  For that I have chosen the following fabrics.
Two main fabrics for the background as seen in the photo below. It isn't interesting to divide the space directly in half or to make the line between the two areas straight.  Varying the line makes an otherwise static representation a lot more fluid and interesting to look at. 

I have used three fabrics to represent the leaves'  veins, shadows and highlights, and one fabric for the stems. The stem fabric has enough value range all by itself.  This was one of those "lucky" choices that turned out a little better than I thought it would. I won't have to add highlights to achieve a realistic look.
You can see the original photo I am working from in the frame above.  I use a ruler to gauge the ratio of photo to finished work. Then some simple equations sort out the size pieces I need to cut.

That high school algebra comes in handy after all :)  


Next we will begin the Fuchsia flowers.

More next time.  ~ LW


New Project - Fuchsia Plant Fabric Collage


Art is the unceasing effort to compete with the beauty of flowers - and never succeeding.      ~ Gian Carlo Menotti

One of the things that really draws me to fabric collage as an art form is the challenge of it.  Using small cuttings of fabric to depict what I see around me is fascinating; with all of the patterns of light, shadows and reflections represented in different fabrics.   It really is an adventure with every piece I do because there are always surprises along the way. Fabrics will sometimes look even better than I thought they would, but there are also those times when  I have not chosen the right one at all and I have to go back to hunting.  In the past, I have always used found fabrics,that is, already printed fabrics found in fabric stores , or  vintage clothing, for example.  But I have begun to see how amusing it can be to play around with coloring my own fabric .  There are so many ways to do that , but I will leave that for another day. 
I am thinking I will begin a series of Floral Fabric Collages in honor of Spring. These will be on a smaller scale than I have been doing and will probably be installed in a different way.  More about that later.  But as promised, I will try to give a little more detail about the process I use in making fabric collages.
 The first piece in this series will be the Fuchsia Plant pictured above.   I love the colors of this photo. .  It was actually a 35mm slide taken many years ago of my mother's hanging fuchsia plant.  The shades of green and aqua contrast beautifully with the  "fuchsia"  of the plant  and the composition is quite nice as well,  so I have decided to copy the photo pretty much as it is with only a few minor changes. All of the floral collages I'm working on will be in the range of 8" to 10"  high  by  8" to 14" wide.  A rectangular size will probably work better with this one.  Once I have decided on the finished size, I will cut my base fabric the finished size plus about a 3" border all around.   I tape the base fabric to a masonite panel or heavy cardboard to keep it from shifting while I am working on the piece.  The photo below shows the back side of the masonite board after I have taped it.  I could also tape it flat on a larger board. This is the method I use if I 
 want to add a mat to the finished piece.  I can then remove the tape, lay it flat , put it on a backer  and add a mat over top. If I am not using a mat, I usually adhere the base fabric permanently to the masonite , which makes it almost like a painter's canvas. 


At this point I will take some time to analyse the Fuchsia plant photo.  I need to determine the values that are present in the photo.  In other words, the range of darks to lights that I need in order to represent the picture accurately.   For example,  I am seeing about 6 values in the flower alone.  So I need to find that many different  "values"  of fabrics to represent them.

Then I collect my fabrics.  I usually start with more than I think I will need and weed out the ones that just aren't working.  I "audition" them together to get the most pleasing combination in the final product. For the flower  I have narrowed it down to the fabrics shown below; with the lightest fabric for the highlights in the flower and the darkest fabric for the shadow on the background flower. I may decide I need to go a bit darker for the shadow, but for now this is the basic range of values I will work with.
When I have selected all of my fabrics, I am ready to begin the actual collage. 
More in the next post!
~LW