Tuesday, December 27, 2011

Guest Artist

With a sigh of relief, I am taking a day of laziness.  Up to almost the last minute I was extremely busy, with everyone wanting something sewn to embellish their home before Christmas.  What a joyous time of year!!  I love to celebrate the birth of our Savior and build wonderful memories with family and friends.  But it can be a very busy and tiring time!!  Now it is time to relax!
The continued struggle to find time for Fabric Collage was never more evident than in the last 2 months.  Hence, the lack of posts on this blog.  I am taking this week between Christmas and New Year to rejuvenate.  Included in that rejuvenation will be some finished Collage pieces.  One is a late November birthday gift for a friend and another is a commissioned piece to be given as a Christmas gift...also late :(.

I am pleased to have been in recent communication with Dattatreya Phadke.  He is a Pathologist in Novi, MI who has enjoyed doing many forms of art since childhood.  Among his pursuits are handmade greeting cards, acrylic, one-stroke, watercolor and watercolor batik painting as well as photography.  His education and career in the medical field has prevented him from pursuing art in a formal way, but, he uses his spare time to satisfy his creative flair.  His most recent addition to this list is his experimentation with fabric on canvas.   His first piece is called  "Harmony"  which he did with whatever bits of fabric he could find at his home.

"Harmony"
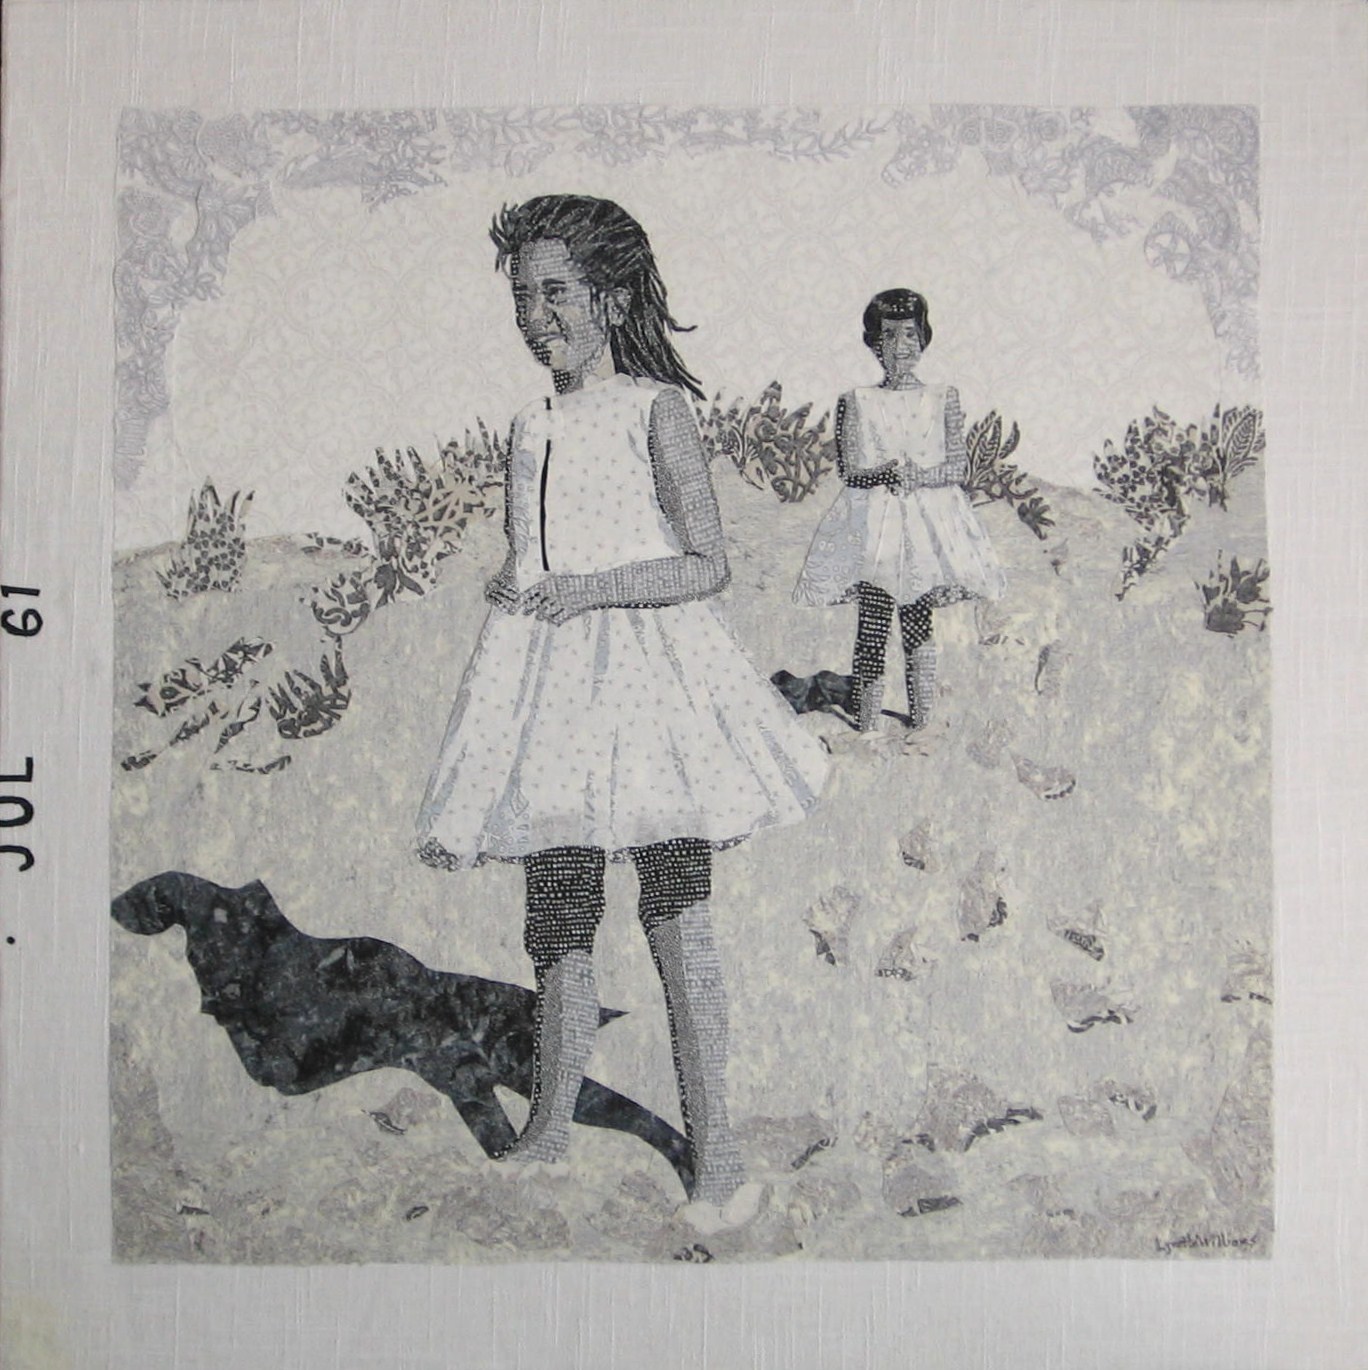
                                                             12" x 12"  Fabric Collage on boxed canvas
                                                                                  by Dattatreya Phadke


 Since that first endeavor, Dattatreya has enlarged his portfolio.
I really enjoy his style and felt compelled to share his art.   
"Bird of Paradise"
11" x 14" Fabric collage on canvas panel
by Dattatreya Phadke


 In this piece, Dattatreya achieves a beautiful blend of colors.  The background is gorgeous but does not over-power the birds of paradise flowers. 


                                                                         In Bloom 
                                                     11" x 14" Fabric Collage on canvas panel
                                                                                     by Dattatreya Phadke


 I love this vibrant suggestion of a flower in full bloom.  I think balance and texture are the keys to this pieces' success.


In a piece such as this, the selection and placement of color is crucial and that is what Dattatreya does very well.

                                                                       Snail Trail
                                                  11 x 14  Fabric Collage on canvas panel
                                                                by Dattatreya Phadke


                                                                   Fall Splendor
                                                                     11" x 14"  Fabric Collage on canvas panel
                                                                                      by Dattatreya Phadke

                                                                            
Dattatreya found inspiration for this piece from a photo he took in Traverse City, Michigan this fall.
Beautifully done !

I hope you have  enjoyed these as much as I have.  Thanks to Dattatreya for his willingness to share his art with us !  I am looking forward to seeing what he creates next.
Till next time !
LW

Thursday, October 6, 2011

The Paper Garden

I am reading a book titled "  The Paper Garden"  by Molly Peacock.  I want to own this book !  It is not only interesting but just a beautiful book !   It is about a woman named Mary Granville Pendarves Delany who lived in Great Britain in the 1700's and at the age of 72 began her "career" as , what we would today call,  a paper collage artist .  She noticed one afternoon that a piece of colored paper matched the dropped petal of a geranium.  She began cutting petal shapes out of the paper and her fascination began.  She called these creations  "flower mosaicks"  and completed nearly a thousand cut-paper botanicals in the next 10 years.  Remember, she began at age 72.  That is amazing, not to mention inspiring !
She always painted the paper on which they were mounted with black watercolor and..."once dry, she'd paste onto these backgrounds hundreds ....of the tiniest dots, squiggles, scoops, moons, slivers, islands and loops of brightly colored paper, slowly building up the verisimilitude of flora"  ( p.4).   Mrs Delany's niece donated hers works to the British Museum in 1895 where they are bound in leather-edged volumes and seen by appointment!
"The Paper Garden"  credits Mary Delany with the rudimentary creation of collage at a time when paper of all kinds, including wallpaper, was handmade.  She actually did use some wallpaper but mostly she would paint rag paper with watercolors and cut the pieces for her work from them.  Here is an example of one of her most famous and most popular images - Damask Rose.  Mrs Delany was 80 years old when she completed this !


The author counts 71 pieces in the main flower .


Mrs. Delany is said to have poured herself into this endeavor as  
" employment and amusement"  to fill the void after the deaths of
her beloved sister, Anne, and her husband, Patrick, whom she called her best friend.

I am looking forward to reading the rest of the book but am already tremendously inspired,  since I too have started on an artist's journey rather later in life than most.
LW

  For more on the life and works of Mary Delany you can follow this link :
http://www.britishmuseum.org/search_results.aspx?searchText=Mary+Delany


Thursday, September 15, 2011

"Frog Heaven" - Fabric Collage Art

Finally finished !  This is probably the largest piece I have done to date - 24" x 48"  I enjoyed the larger work area and anticipate doing more of this size or larger.  It takes a lot more fabric so that will have to be a consideration when purchasing a piece of fabric that seems to have potential.......getting enough in case it will go in a larger piece.  Because if I have to go back for more, I am likely to be disappointed.  Especially if it is several months down the road.
As I have said before, I like art that tells a story somehow or suggests more is going on than what is immediately visible.  The cattails'  reflection in rippling water in the right foreground adds movement to the piece suggesting a pond teaming with life.  It carries to the slight water movement  by the lilies' reflection and the image of the frog about to hop on the pad.  I chose colors that may not be explicitly realistic but complement each other and give enough reference to a cool summer oasis......at least for a frog.


Friday, August 26, 2011

Frog Heaven

One of the projects I have been working on lately is this lily pad piece.  I recorded a frame every time I added a piece of fabric. It is a rather tedious process.  This piece is still in progress with many more details still needed ...... and there will be a frog in there somewhere since the title is  "Frog Heaven"


Wednesday, August 10, 2011

Labor of Love

Here is a recently finished piece.   I know these darling children, so the pleasure of working on this fabric collage was doubled.  I tried to capture their joyful smiles

I had the most fun with the girl's hair.  I used several different fabrics to explore the play of light on her hair. If you look closely, you will see 6  individual fabrics just on the hair. You can achieve a greater amount of depth when you use more fabrics of different values.


Here is a very short clip of part of the progression of this piece.  At one point, I decided I did not like the fabrics I had chosen for the face and began again.  The tools I use the most are tweezers, a ruler and small, very sharp scissors.
Quite a bit more tweaking was needed to get to the finished version, but at the end of the clip you begin to see the direction I am headed

Sunday, July 31, 2011

Shades of Gray

July 31, 2011
Summer is slipping by so quickly !  The best laid plans to get more studio time in and see some real progress on pieces I have already started have slipped by as well.  The commissions I have received kind of put everything else on hold.  Mind you....I am not complaining.
I was commissioned by an Interior Designer  to do a representation of  one of her client's  black and white photos taken in the early 60's.   The photo was  3" x 3" and was  to be a finished size of  24"  x  24".   I suggested doing it to look like a black and white photo with the date placed on the side of the piece just as it was on the white side margin of the original photo.


It was an interesting and challenging piece.  The first challenge I encountered was finding fabrics that looked like the blacks and whites of the photo.  There are really more grays than anything in the photo.  And so many fabrics that I thought might work ended up looking more sepia than b & w.   Turned out to be a really good exercise in finding the scale of values in fabrics I work with.   I usually do that anyway, but working with a gray scale was not something I did a lot of in the past.  Along the way, I have discovered that gray scale evaluation can be very helpful.
 Sometimes it is difficult to determine whether one color printed fabric has a lighter or darker value than another.  If I take my selection of fabrics for a color piece I am working on and photograph them in an overlapped row,


then change the photo to a black and white version,


 sometimes it will help me to order my fabric selection from lights to darks.

When they are reduced to shades of gray, it is easier to see the overall value of the fabric when compared to another.  So....some good lessons learned on this road !   My client was very happy with the result which made it even more rewarding !!
~LW

Monday, July 18, 2011

Exhibition News !!

My Fabric Collage  "Clematis"  will be part of an exhibit featuring visual arts from all over the state of Michigan.  It is a juried competition that drew almost 400 entries from which approximately 80 pieces were selected.  I am honored to be part of this show and look forward to viewing the entire exhibit in September.  If you are in the Holland, MI area at that time,  I am sure it will be a worthwhile visit to the Holland Area Arts Council to view this all-media show !
LW

Friday, July 15, 2011

Featured Artist on Artsy Shark

A great big thank you to Artsy Shark; a website for emerging artists,  for featuring my Fabric Collage Art this week ! This is a great website showcasing artists from all over, representing all media.
Here is the link:     http://bit.ly/oZhIVz

Sunday, June 5, 2011

A daughter getting married surely is distracting !!  It was a beautiful beach wedding and my daughter and new son (in law) are relaxing in Jamaica !  Back to normal now, I think.

The piece I am showing is a work in progress.  It has been in progress for quite a while.


My desire is to work on some more nostalgic pieces.  (Is my age showing ??)  This is from a photo taken by a friend of mine quite a few years ago (  transistor radio is a dead give-away) .   I love the photo.  They seem to be part of an idyllic time and place.  Makes me want to go there.  Anyway,  I have a long way to go on this one.  I will update my progress as I go.  I am determined to finish this  by the end of the month if not sooner.  Refusing to use anything but fabric in my work (no pen, ink, paint or marker for defining lines or shading)  makes it a bit daunting and even frustrating at times, but overall,  I love the challenge ,  or I wouldn't continue to attempt it.
Hope to show an update soon !!  
~LW 

Sunday, May 1, 2011

“Realism doesn’t require verisimilitude, only just enough visual cues to exploit the mind’s credulity.” _Peter Schjeldahl


                              Recently finished piece

"City At Sunset"  ~Fabric Collage  ~  12" x 16"  ~ Lynette Williams

Wednesday, April 27, 2011

Linocuts

Sometimes what I do- Fabric Collage- reminds me of linocuts.  Since a successful linocut print relies so heavily on the juxtaposition of texture and pattern, it resembles the same technique of placing different textures and patterns of  fabrics in relation to each other for effectively portraying an image.  This example by Pablo Picasso demonstrates the use of multiple patterns to achieve the desired image.
"Still Life with Glass Under the Lamp"
And another example by artist Monica Miller
 
In a linocut, there is, out of necessity,  no  blurring of lines between different patterns of the cuts, since it is used as a printing block.  Because linocut prints are often black and white, they require very specific direction of cuts adjacent to each other  to delineate a specific image.  This is also true of fabric collage.  The medium itself dictates that textures or patterns placed next to each other are distinct in order to define image, background, shadow, etc. Using batik fabrics can alter this a bit because their patterns are a bit more blurry to begin with. Batiks give more of a watercolor effect.  ~LW

Wednesday, April 20, 2011


Ok, so it’s raining outside and it’s not balmy anymore like that teaser we got last week.  It’s all good !!  Chicken Corn Chowder simmering on the stove and this quilting project that has really got me excited, is keeping me going on this gray day .  I am working with limited time, so, instead of tracking down my mother’s old quilt sticks and spending a delightful afternoon over tea, with sisters or friends, hand-stitching this quilt, I am forced to do the speedier method.  In order to make it easier to handle, I am machine quilting sections of the quilt; about 26” square at a time.  Starting with the center block, I have machine-stitched basically in diamond patterns; following the pattern of the quilt.   It’s important to keep the outer edges of each 26” block free from stitching since we are sewing the tops of the blocks separate from the backing.   This is the back side which shows the stitching lines better. 

There will be 5 blocks like the center and 4 of the alternating pattern
                       
When all the blocks are completed, lay them all out to make sure they will be sewn in proper order and orientation.  There are 3 rows of 3 blocks this size ( 26”).  So I am sewing 3 blocks in a row.  The next block to the right of center is sewn , right sides together, on top of the center block..   Stitch only the top pieced layer and batting of the second block to the pieced layer and batting of the center block , leaving the backings free.


.  Fold flat and on the back side,  fold over the raw edge of the quilt backing of one block and tack that in place by hand over the backing of the other block so there are no raw edges . 


Then, topstitch this from the right side to make a more finished look.  Repeat this process with the block to the left of center. This leaves me with a rectangular piece consisting of 3 – 26” blocks sewn together in a row.
Repeat this with the remaining two rows of 3 blocks.  Then sew the three rows together on the long side using the same method of leaving the backing free and tacking it by hand on the back, then top-stitching on the right side .  Once this is finished you have all of your quilting already finished and we are ready for the borders.
 I am a little ahead of myself here, so I will come back when I am caught up to do the borders.    See you then !!     LW                     

Tuesday, April 12, 2011

Quilting Interlude

Taking some time to finish a quilt I began a couple of years ago (oh, horrors !!).  This is one of those projects I had started with great enthusiasm and had made some real progress and then  forgotten about in the midst of day to day work , etc.  I was inspired by a quilting show I had seen where they featured strip quilting.  I have used the strip-quilt method before, but usually for a log cabin pattern. I wanted to do a design using triangles where little if anything was wasted when cutting the strips to make a pattern. Over the next while I was thinking about a home for the quilt I wanted to finish "someday".  I don't really need it and wanted to give it to a worthy cause.  Well, I now have one.  There is a 10-year old boy in my area fighting an aggressive form of brain cancer and they are having an auction this month (April) to help the family pay for medical expenses.  That is a match made in heaven !  I now have a great desire to finish the quilt and am so happy it will have a place to go.
This is what I have so far.  The rest will be repetition of these patterns for the most part.


There are 6 different fabrics used in this quilt.  It's mostly a monochromatic look with a couple of darks thrown in for effect.  Each strip is cut 3" wide and sets of 2 strips (according to pattern) are sewn together- lengthwise and then cut into triangles.  There are a couple of  places where there are 3 strips sewn together.  This is necessary to make the blocks square.   The fabrics represent  1 to 6 from left to right in the photo below.


Below is the basic layout of the whole quilt, but I might need to do some half-blocks or extra borders to make 
the finished dimensions correct, since this is basically square.


 Starting with the center block (outlined in blue above), I am using all 6 fabrics as shown in the diagram below.  I have drawn lines to show where the triangles are.  So, for the center block I am sewing together strips of fabrics # 1 and # 3,  #2 and  #3,  #3 and #4, and #3,#5 and #6 ( the only 3-strip triangle in this block).


After the strips are sewn together the triangles need to be cut.  The base of the trangle is about 11.5 inches . The height is about 5.5 inches at the point. When you cut the triangles, for example, with the #3 fabric at the top point, you have left, the opposite triangles with the #3 at the bottom.  Those, as well as the other "opposite" triangles, I am using in the other surrounding blocks or borders around the entire quilt


Strips for the second block are sewn together as follows: fabrics # 2 and #3,# 3 and #4 and #2,#3 and #5.  I would suggest sewing the #5 fabric on after cutting the 2-strip triangle of fabrics #2 and #3.  Otherwise you will get all of those "opposite" 3-strip triangles that may not have a home and will cause more waste.


From the example of fabrics #2 and #3 in the photo above the  triangles with the #2 fabric at the point of the triangle and the #3 fabric at the bottom are used in the blocks surrounding the center block.  These are outlined in blue in the photo below.  Actually there will be a third strip  of #5 fabric (mentioned above) sewn to this triangle to complete the size needed to fill out the large square block.
As for piecing the triangles together,  I can give more information to anyone who is interested, but as a general rule, you want to sew in straight lines whenever possible.  That means you sew triangles into squares or rectangles or larger triangles and then sew those pieces together.  The back side of the pieced quilt below, may give you an idea of how you can do this.


 This is probably a bit confusing to beginners, but for you avid quilters.....it should give you a pretty good idea of what I am up to.  I will hopefully add more details about my progress as time permits.  If anyone is interested in more details about construction of the quilt or the pattern idea, I would be very happy to share as best as I can.  I will admit it was a sort of fly-by-the-seat-of-your-pants design.    But I will do my best to explain or answer questions.  Just contact me by email :  lynettelwilliams@gmail.com
Hope it inspires you to strip quilt.  It really is a very versatile way to make quilts quite fast !
Have fun !!
LW


Thursday, April 7, 2011

Spring Break

This week is Spring Break week for lots of schools in our area. Weather is finally warming up a little here in Michigan. Crocuses (shouldn't it be croci?)are peeping through the leafy brown earth.  What a joy to see them !!  Nature is a common inspiration for artists .  It isn't any wonder.  Nature is dazzling this time of year ...not so much for the color , yet, but for the metamorphosis below and above ground that seems to excite all of nature.  It spurs the imagination .
I am not writing about fabric collage today because I have some sewing projects with deadlines that are looming over me and I cannot do what I would rather do. That does allow me to take a step back from pieces I am working on in fabric collage, though.  I find that is a good thing.  Taking time to stop a piece of artwork and get some distance from it often gives me a fresh perspective and attitude  and helps me to improve the piece when I return to it.  


Life imitates art far more than art imitates Life.
Oscar Wilde